The patented Smith & Nephew BIORCI Screw System enables a reproducible cruciate ligament reconstruction technique for the endoscopic fixation of either hamstring or patellar tendon cruciate grafts. The innovative hamstring surgical technique provides reduced soft-tissue morbidity and pain on kneeling. Cost is also reduced since the procedure may be performed on an outpatient basis.
Fixation of either the hamstring or patellar tendon graft is achieved at the anatomic insertion site of the native ACL using the BIORCI Screw, providing aperture fixation at the femoral tunnel. The screw is also used to fix the graft inside the tibial tunnel, thus providing a short graft construct.
The BIORCI Screw has rounded threads along its entire length to protect the graft during endoscopic insertion. Its hemispherical head reduces interfiber stress as the graft exits the femoral tunnel. The head also compresses the graft against the aperture of the femoral tunnel, preventing graft movement and synovial fluid ingress, allowing for easier biologic fixation and providing a secure anatomic reconstruction.
The following technique describes endoscopic ACL reconstruction fixing the hamstring or patellar tendon graft utilizing the BIORCI Screw System.
Portal Placement
Routine arthroscopy is performed prior to ACL reconstruction. Proper portal placement is critical. The anterolateral portal must be toward the top of the lateral triangle soft spot – adjacent to, but not crossing the patellar tendon’s lateral border (Figures 1 and 2). The anteromedial portal is slightly lower, approximately 1 cm above the joint line. The anteromedial portal may be checked with a small gauge needle to ensure that the medial meniscus is avoided (Figures 1 and 2).

Semitendinosus And Gracilis Tendon Harvest
The graft is constructed by doubling the semitendinosus and gracilis tendons, yielding a four-limbed graft. The tendons are harvested through a 3 cm long incision, 1 cm medial to the tibial tubercle, overlying the pes anserinus insertion. The stripper is carefully advanced, separating the tendon proximally from the muscle, while pulling distally on each tendon. When harvesting each tendon, ensure the accessory distal insertions of the semitendinosus are divided, and do not divert the harvesting tool into the body of the tendon. Using an ACUFEX™ Tendon Stripper will generally result in two tendons at least 22 cm in length (Figure 3).

Hamstring Graft Construction
After the tendons are cleared of adherent muscle fibers, their length should be measured and the midpoint determined. Ideally, this is approximately 11 cm from the distal insertion of the tendons. The broad, proximal surface of the semitendinosus may be wrapped around the gracilis tendon to give the graft a smooth exterior surface. The graft is constructed by doubling the two tendons over two #5 sutures, which will subsequently act as lead sutures.
The resultant four-strand hamstring tendon complex is sutured, using a #2 suture with a modified baseball stitch on each end. The looped end of the graft (for femoral insertion) should have at least three stitches securing the whole of the tendon mass for a length of 25 mm (Figure 4).
At the free end, the four tendon strands are sutured for 30 mm with a #2 suture using the running baseball stitch (Figure 4). Any free tissue which bunches up and obstructs passing of the graft should be excised. The completed graft construct should be 11 cm long.
A mark is made on the graft 30 mm distal to the looped end with a sterile marking pen. This mark is used to ensure the graft is pulled up sufficiently into the femoral bone tunnel. The diameter of the graft construct is measured at both the proximal and distal ends, using the sizing tubes to determine the appropriate RCI routers.

Femoral Drilling
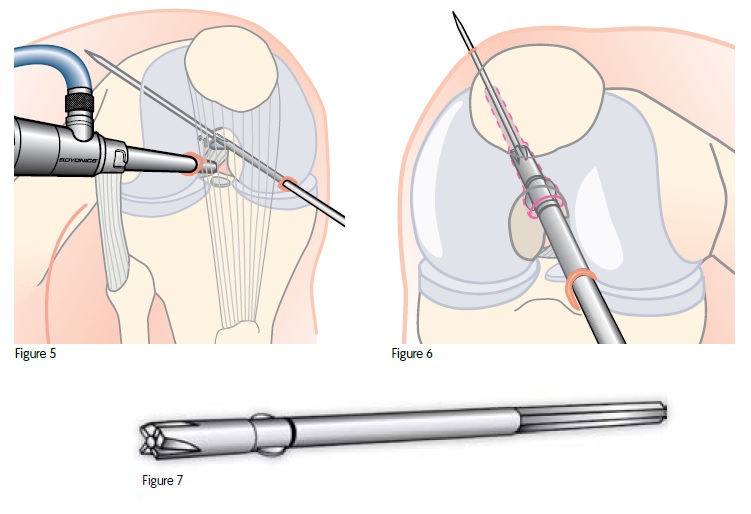
Insert the 5 mm offset Universal EndoFemoral Aimer into the medial portal. Positioning the knee in full flexion (normally 120°) will enable the tip of the aimer to be located at the “over-the-top” position. Position the aimer with the 2.7 mm drill-tip passing pin* placed 30° from the roof of the notch (11 o’clock in the right knee, 1 o’clock in the left knee) at the point 5 mm anterior to the posterior cortex of the notch (Figure 5).
Once the aimer is properly positioned, the passing pin is placed in the aimer and the tip engaged into bone. The pin is drilled through the femur and pushed through the skin of the anterolateral thigh. The aimer is then removed and the position of the pin in the notch is verified. The pin should be directed approximately 30° anteriorly and 30° laterally, with respect to the femoral long axis.
With the knee held fully flexed, the RCI femoral router is advanced along the passing pin and the femoral tunnel drilled under direct vision. The femoral router has a diameter equal to that of the measured proximal tendon graft (Figure 6).
It is imperative that the femoral router continue up to the laser mark just distal to the router’s wings (Figure 7). These wings countersink the tunnel entrance to accommodate the graft and screw head, increasing the cancellous area for biologic fixation of tendon to bone.
*A 2.4 mm passing pin is also compatible with this step.
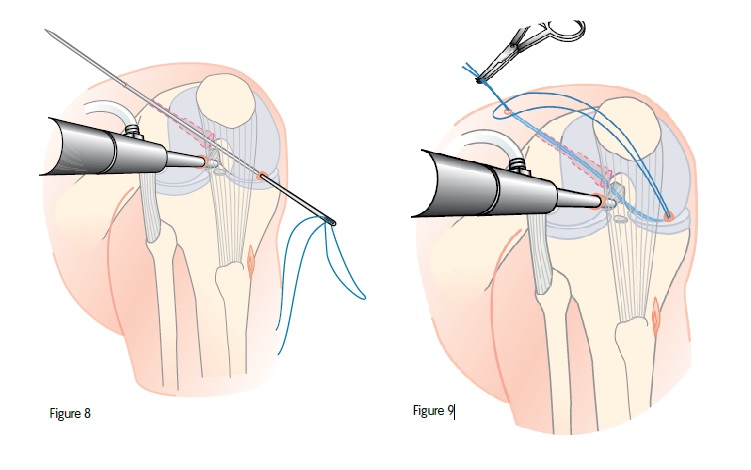
The femoral router is removed and a #1 suture is threaded into the slot of the passing pin. With the looped end of the suture held externally, the passing pin is drawn into the joint and out through the femur, drawing the free ends of the suture out through the lateral thigh (Figure 8).
To prevent losing the suture inside the joint, the free ends of the suture may be clipped onto the loop on the outside of the knee (Figure 9). The edge of the femoral tunnel may be smoothed and debrided of any loose tissue.
Tibial Drilling
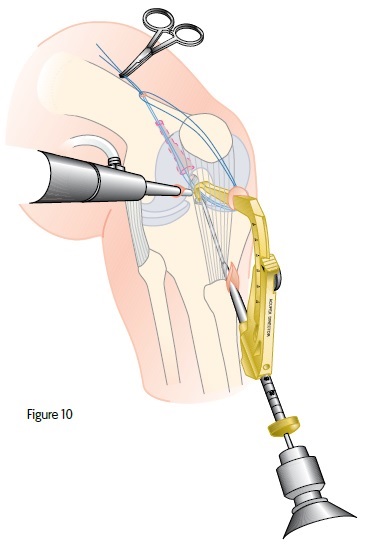
The tibial hole is made using an ACUFEX™ Director Drill Guide. The tip of the guide is passed through the anteromedial portal and positioned to create a tunnel that enters the joint through the posteromedial portion of the ACL footprint.
The drill guide is set to make a 45 mm long tibial tunnel that corresponds to the 45 mm length of the RCI tibial router (Figure 10).
A 2.4 mm drill tipped guide wire is used to establish the line of the tibial tunnel. After drilling, the position of the guide wire should be checked to ensure it enters the joint through the posteromedial fibers of the ACL footprint.
When utilizing 35 mm BIORCI™ Screws, note the length of the tibial tunnel prior to drilling to ensure adequate tunnel length for fitting the screw.
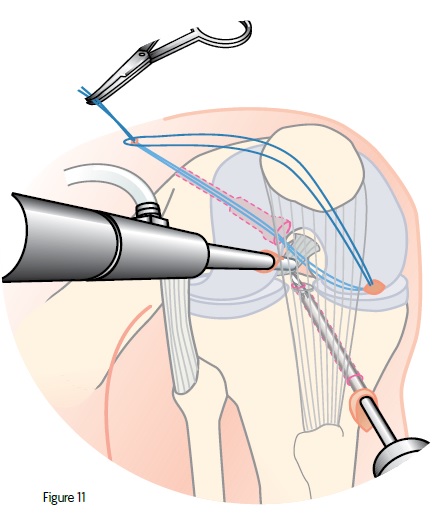
If not satisfied with the placement of the guide pin, the Universal EndoFemoral Aimer may be used to reorient the placement of the 2.4 mm pin to a distance of 2 mm to 5 mm from the original drill hole. Drill the tibial tunnel using the tibial router with a diameter equal to that of the graft’s distal end (Figure 11).

Graft Passing
Prior to passing the graft, a screw starter may be used. This will create a small pilot hole to ease insertion of the BIORCI™ Screw. With the knee at 90° flexion, insert a grasping arthroscopic forceps through the tibial drill hole until the jaws of the forceps are around the #1 suture previously passed through the femoral tunnel. The looped end of the suture is then pulled through the tibial tunnel (Figure 13).
This suture loop is now passed through the tibial and femoral drill holes and is used to pass the graft. The #5 lead sutures from the graft construct are pulled through the joint by the #1 passing suture, pulling it proximally first through the tibial tunnel and then through the femoral tunnel (Figure 14).
The graft is drawn into the femoral hole until the 30 mm mark on the graft is at the entrance of the femoral tunnel.
 Femoral Fixation
The 1.5 mm screw guide wire is introduced through the anteromedial portal. Place the tip at the femoral tunnel entrance, between the anterior edge of the tunnel and the graft. The knee is then fully flexed and the guide wire advanced to its 25 mm mark. As the femoral drilling was made through the anteromedial portal, collinearity of the fixation screw and graft is assured (Figure 15).
A BIORCI™ Screw and the 1.5 mm BIORCI Torx Driver are run over the guide wire through the anteromedial portal and into the joint under arthroscopic visualization (Figure 16).
Note: See Appendix B for instructions on using reverse thread BIORCI Screws on right knees.


Maintaining traction on the graft through the distal and proximal sutures, the screw is advanced (Figure 17). Care must be taken to ensure the driver remains fully seated within the screw body. Failure to do so may result in screw failure. The screw is advanced until the head is completely buried within the femoral tunnel, ideally 5 mm deep to the internal femoral cortex aperture.*
With the knee still fully flexed, the guide wire is removed. The head of the screw should not be visible once the screwdriver is removed and the knee extended (Figure 18).
* If hard bone is encountered, use a sized BIORCI™ Tap. 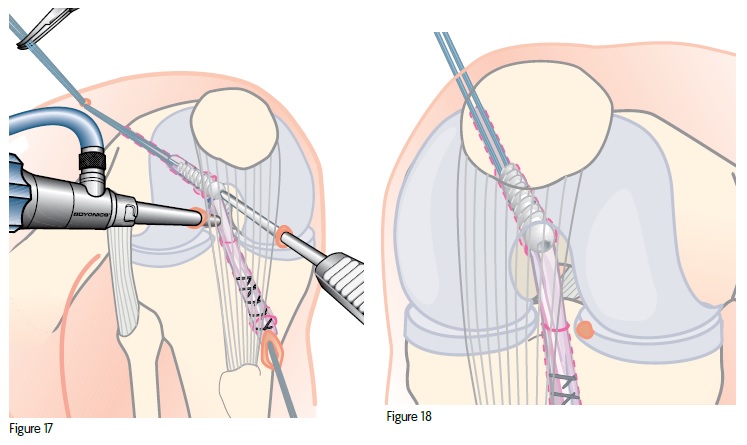
Tibial Fixation
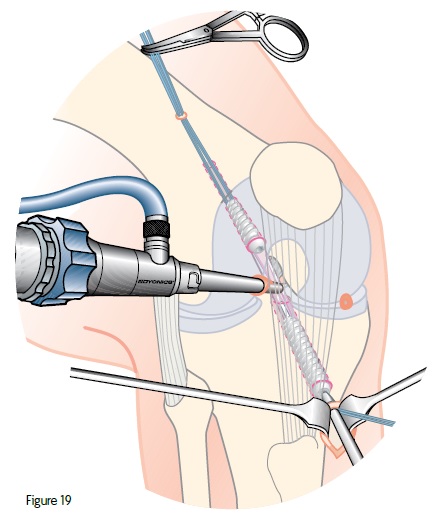
After fixing the graft in the femoral tunnel, the knee is placed at 90° flexion and the distal end of the graft pulled firmly down the tibial tunnel. As the knee is placed through a range of motion, the surgeon should visually check that the graft does not impinge on the condyles of the notch. If so, a notchplasty may be required or more posterior placement of the tibial tunnel may be made.
The graft is then pulled taut and the 1.5 mm guide wire inserted between the graft and the posterior aspect of the distal tibial tunnel. While maintaining tension on the graft, and holding the knee at 30–40° flexion, the BIORCI™ Screw is advanced until it is partially inserted. The knee is gently extended to 0° to ensure that full extension is achievable, and the screw is advanced fully until the head is in the tunnel (Figure 19). The guide wire is then removed.
Thirty-five mm BIORCI Screws may be substituted to maximize graft fixation in the tibia. When determining tibial screw diameter and length for fixation, the following points should be considered:
- Increasing length is more effective in increasing pullout resistance than increasing diameter
- In soft bone, screw diameter should equal or exceed hole diameter.
- In hard bone, screw thread diameter should be less than the hole diameter.
The knee’s range of motion, Lachman’s test and anterior drawer test may be performed to ensure that stability has been achieved. The knee may be inspected one last time, irrigating and suctioning any remaining debris. Proximal lead sutures are removed from the lateral thigh puncture and the wound is closed in layers over a drain. Routine dressing and postoperative care follows.
Appendix A
Transtibial Approach Using BIORCI™ Screws
In addition to the medial portal approach described previously, a transtibial approach may also be utilized for ACL reconstruction using the BIORCI Screw System.
Tibial Preparation
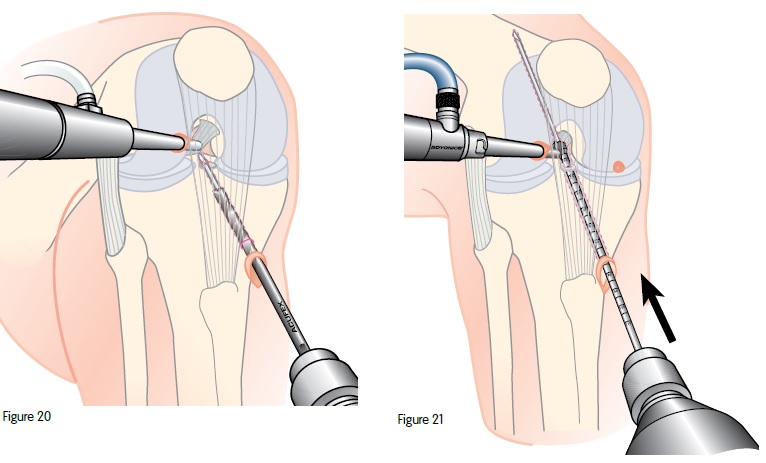
The tibia is prepared using the ACUFEX™ Director Drill Guide and a 2.4 mm drill guide wire. A cannulated drill bit, matched to the diameter of the graft, is utilized to prepare the tibial tunnel. It is not recommended to use the “acorn” endoscopic cannulated drill bits as they may be deflected anteriorly by the hard bone of the tibial spine. This could result in less than optimal tunnel placement (Figure 20).
Femoral Preparation
After the 2.7 mm passing pin has been placed using the Universal EndoFemoral Aimer, an endoscopic cannulated drill bit is passed through the tibial tunnel and against the overthe- top position. Care must be taken to avoid the posterior cruciate ligament (PCL). With the knee in approximately 90° of flexion, power is applied and the drill bit is advanced to its 30 mm mark. The rims of the femoral and tibial tunnels may now be smoothed to avoid any hard cortical edges (Figure 21).
 APPENDIX B
Reverse Thread Screw – The Right Solution
The reverse thread BIORCI™ Screws are indicated for use in ACL hamstring fixation in right knees. The reverse thread screw is a patented screw that addresses two basic challenges.
Visualization
When using a (clockwise) right-threaded screw in a right knee, there is a tendency for the graft to “wind up” around the screw, reducing the surgeon’s visibility of the screw during insertion. The reverse thread BIORCI Screw is inserted in a counterclockwise fashion (left direction – reversethreaded to a standard screw). The advantage is that it allows proper visualization of the femoral aperture and ensures that the screw is fully countersunk.
Orientation
A hamstring graft tends to wind anteriorly around the screw as the screw is advanced into the right knee femoral tunnel. This anterior rotation may cause the graft to be placed in a less than optimal position. The counterclockwise rotation of the reverse thread BIORCI Screw maintains the graft in its proper posterior orientation.
The reverse thread BIORCI Screw has the same characteristics and advantages as the standard BIORCI Screw with the exception that the threads are rotating to the left. It is designed specifically for ACL reconstructions in right knees.
E - Brochure
What people are saying about our services and treatments
Read what our patients have to say. Thank you for your trust and support!
Surya Gnanaseelan
Patient of Hip Surgery
Highly Recommended!
Jitendra Kumar
Patient of Knee Replacement
Humble and Nice
Ravindra Kadam
Patient of Joint Pain
Listens Carefully
Blogs

Why Do Knee Replacements Fail? Common Reasons for Revision Surgery
Knee replacement surgery is a highly effective procedure that restores mobility and reduces pain for individuals suffering from severe arthritis […]
Why Do Knee Replacements Fail? Common Reasons for Revision Surgery
Knee replacement surgery is a highly effective procedure that restores mobility and reduces pain for individuals suffering from severe arthritis […]

Exercises and Physical Therapy After Muscle Sparing Joint Replacement
Muscle-sparing joint replacement is an advanced surgical technique that preserves the surrounding muscles and soft tissues while replacing a damaged […]
Contact Us
Find frequently asked questions and
important information about us
How to book an appointment?
Call our clinic at +91 9156580303. Make an appointment time that works for you. Come prepared and bring with you important documents. Come early to your appointment.
What is waiting period for general checkup?
In normal days there is no such waiting period for general checkups. If there are some operations so that there are waiting period of maximum 30 minutes and for emergency there are no waiting period.
Is there any online appointment form?
No, there is no need to fill out any kind of online appointment form. But, you can book an online appointment through platforms like our website, practo or you can directly call us.

